The Unified Payments Interface (UPI) is a big boost for cashless transactions. It is an online payment solution that will facilitate the transfer of funds instantly between person to person (or peer to peer) using a smartphone. It is the brainchild of the Reserve Bank of India (RBI) that was launched by the then RBI Governor Raghuram Rajan in April 2016.
To know about UPI-based digital payment app “Bharat Interface for Money (BHIM)”, please click “BHIM In-depth: All You Need to Know About Bharat Interface for Money for Cashless Payments.”
To date, 28 banks have released Android apps for UPI and a few have iOS apps too.
Lets’ know about Unified Payments Interface (UPI).
UPI Platform
The Unified Payments Interface (UPI) facilitates all bank account holders to send and receive money from their smartphones as there is no need to enter bank account information or net banking user id/ password. The service is instant and available 24×7, even on public/bank holidays.
UPI works on the IMPS platform which is an instant fund transfer system. The Immediate Payment Service (IMPS) is one of the electronic funds’ transfer systems in India started by the National Payments Corporation of India (NPCI). It offers instant 24×7 interbank electronic fund transfer service through mobile phones.
For using UPI, you need to create a Virtual Payment Address (VPA) of your choice and link it to any bank account. The VPA acts as your financial address & you also not remember beneficiary account number, IFSC codes, or net banking user id/password for sending or receiving money. You can transfer/receive funds in simple steps by providing the Virtual Payment Address (VPA) of the beneficiary. Also, there is no pre-registration required for the beneficiary.
Key Features of UPI
| S.No | UPI Features |
|---|---|
| 1 | Upper limit per UPI transaction is ₹ 1 Lakh. |
| 2 | Instant transfer of funds on a 24×7 basis, even on public/bank holidays. |
| 3 | Works on the Unique ID system i.e. called UPI -ID. |
| 4 | Provide facility to send and receive money using either Virtual Payment Address (VPA), Aadhaar Number, Account Number and IFSC, Mobile Number and Mobile Money Identifier (MMID)(MMID may be generated through Mobile Banking). |
| 5 | UPI allows a customer to have multiple virtual addresses for multiple accounts in various banks. |
| 6 | In order to ensure the privacy of customer’s data, there is no account number mapper anywhere other than the customer’s own bank. This allows the customer to freely share the financial address with others. |
| 7 | The UPI payment works on 1-click 2-factor authentication for secure transactions. Note: In “1-click 2-FA” authentication, UPI allows all transactions using Device Fingerprint as the first factor & PIN/Biometrics as the second factor of authentication). |
| 8 | For the UPI app, customers can also use the mobile number or Aadhaar number as the name instead of the short name for the virtual address. |
| 9 | No need to remember or share account details when using Virtual Payment Address (VPA). |
| 10 | Customers can transfer money using a Virtual Payment Address (VPA) without adding the beneficiary. |
How to Get Started with UPI
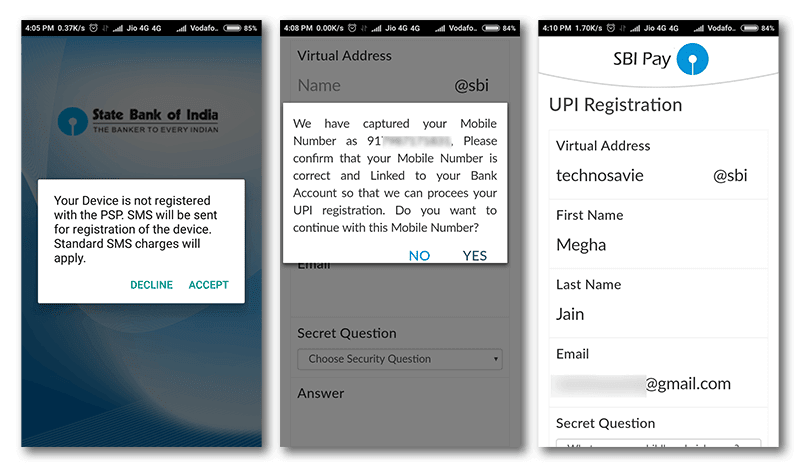
You must have a smartphone with an internet facility to get started with UPI. Now, the procedure of the registration process of UPI app:
| Steps | Process |
|---|---|
| Mobile No. | Register your mobile no. in your bank or ATM. |
| Download & Install | Download the UPI app from bank’s website/ Google Play Store ( or download 3rd party app such as PhonePe). |
| Virtual Payment Address (VPA) | Launch the app after installation and create the login id and your Virtual Payment Address (VPA). |
| Unique ID | Choose your unique ID such as AADHAR and Mobile no. |
| Profile | Create your profile by entering details like name, Virtual ID (payment address), password, etc. |
| Bank Account | Add your Bank Account details for registration. |
| Link | Now, go to the “Add/Link/Manage Bank Account” option and link the bank account number with the Virtual ID. |
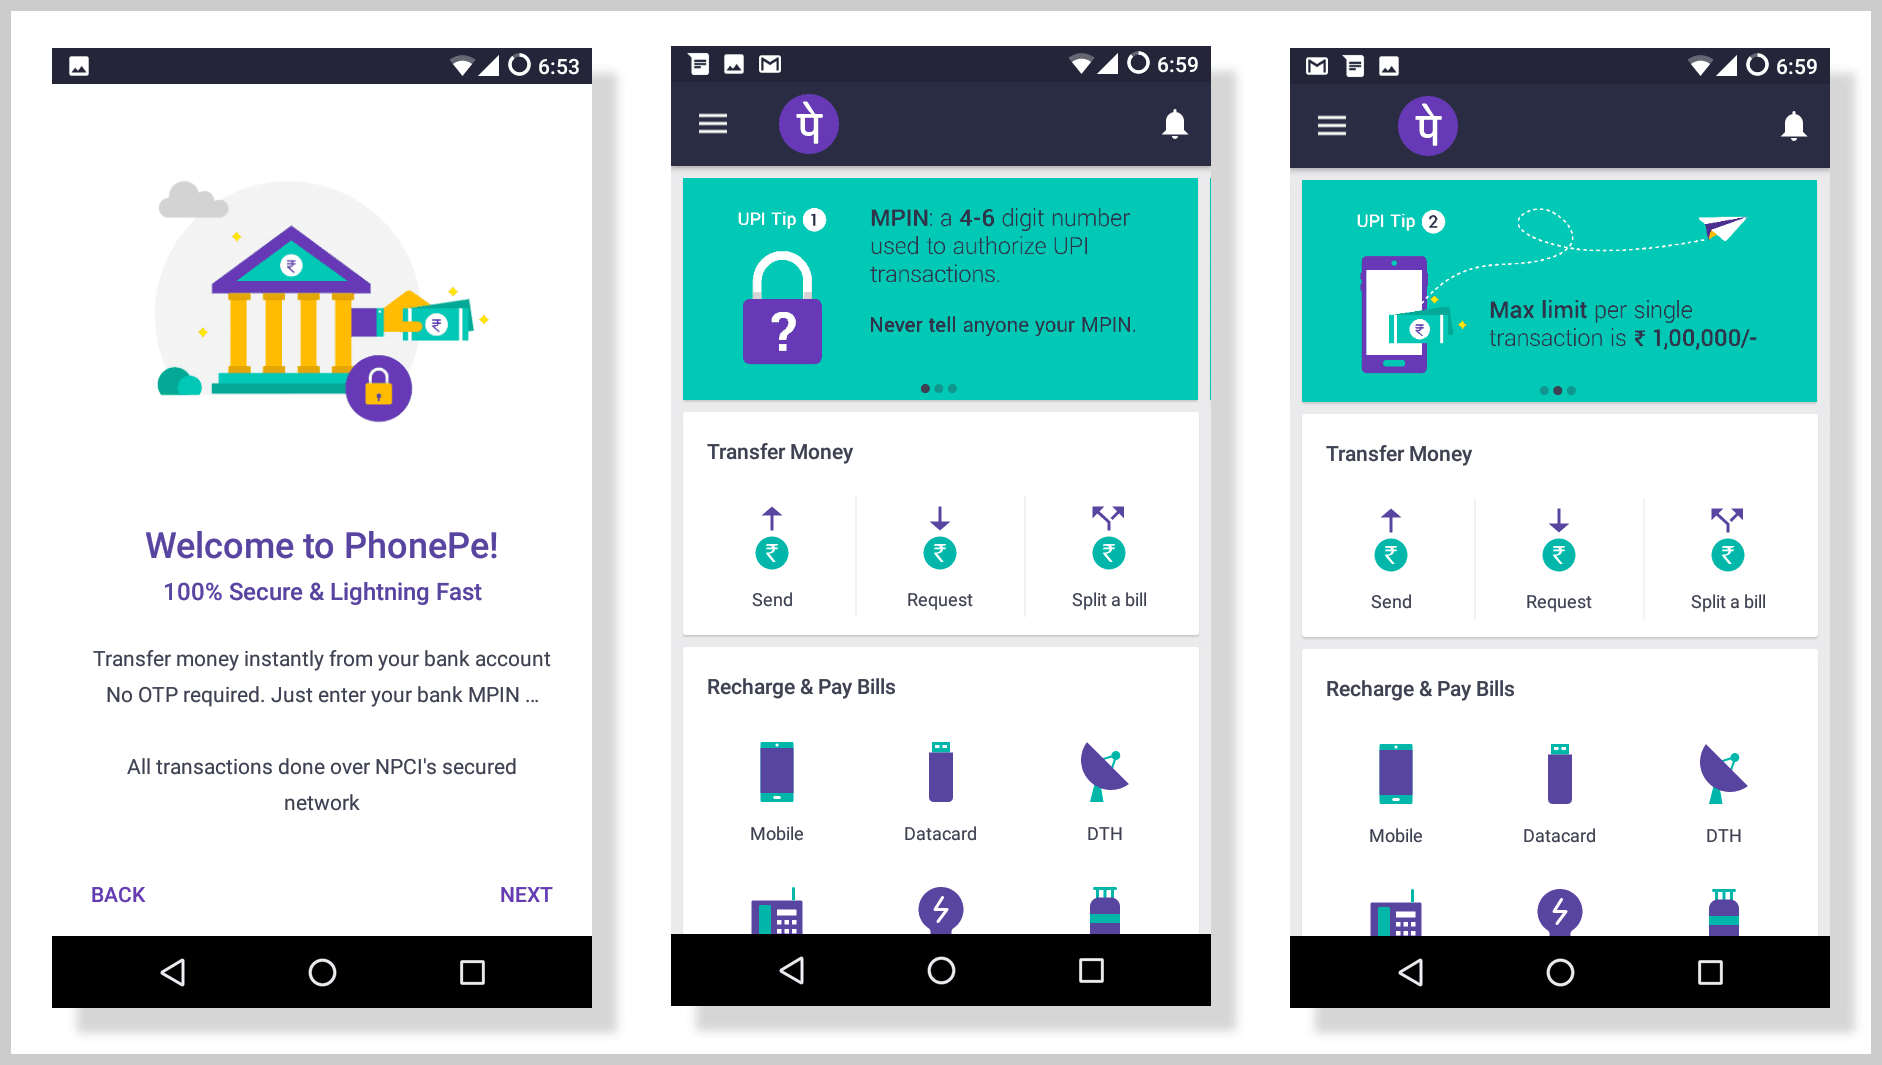
| M-PIN | Finally, M-PIN will be generated. Set M-PIN for validations transactions. |
| Completion | After this process, your UPI Registration Process will be completed. |
Banks with Official UPI Apps
Click on Bank names for downloading the UPI Apps.
How to Create a Virtual Payment Address(VPA)
The Virtual Payment Address (VPA) is an address that replaces your bank account details through which you transfer money into your bank account. To use UPI App it is a must to create VPA.
| 1 | Tap on Add a Bank Account. |
| 2 | Select VPA. It could be your name, mobile number, or even a nickname. |
Let me clear you, the Virtual Payment Address (VPA) has two parts like an email-ID. For example-technosavie@PNB or 9100091000@PNB. The suffix would be a fixed word i. e. @PNB, while you can choose the Prefix. The prefix can be your name, phone number, or anything you want.
| 1 | After choosing the perfect prefix for your VPA, enter your name, email address, security question-answer, and choose the bank which has your account. |
| 2 | Tap on the checkbox of terms and conditions. |
| 3 | Submit the form. |
| 4 | On the next page, you would be shown the last few digits of your account number. |
| 5 | Be assured and tap on ‘Register’. In this way, you can create your unique VPA. |
| 6 | You can use your VPA in place of a bank account or IFSC code to send/receive money. |
How to Generate MPIN for UPI Payment
You have to generate the MPIN by giving your debit card details.
| Steps | Process |
|---|---|
| 1 | Go to the Account Management page. Select the bank account from which you want to initiate the transaction. |
| 2 | You will get two options: 1. Mobile Banking Registration/Generate MPIN 2. Change M-PIN |
| 3 | Tap on Mobile Banking Registration/Generate MPIN. You will receive OTP from the Issuer bank on his/her registered mobile number. |
| 4 | You will receive OTP from the Issuer bank on his/her registered mobile number. |
| 5 | Now enter the last 6 digits of the Debit card number and expiry date. |
| 6 | Then, enter OTP and enters your preferred numeric MPIN (MPIN that you would like to set) and tap on Submit. After tapping submit, you will get a notification (successful or decline). |
| 7 | With this, the MPIN has been set for UPI payment. |
How to Change MPIN for UPI Payment
The process to change MPIN is the same as above in “How to Generate MPIN for UPI Payment”. Simply you’ve to select the “Change MPIN” option instead of “Mobile Banking Registration/Generate MPIN”. Then
- Enter old MPIN and preferred new MPIN (MPIN to be set) and tap on ‘Submit’.
- After tapping submit, you get a notification (successful or failure).
How to Send Money Through UPI
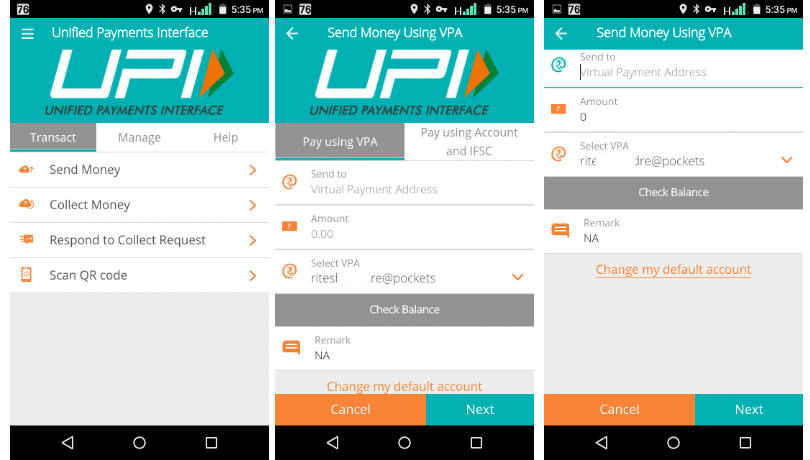
Through UPI, you can easily transfer money to your friends, relatives, etc. To understand the transaction process, assume that “Miss. Madhu” has to send 10,000 to her friend “Miss Varsha” through the UPI app. For this, Miss Madhu has to first Log-in into her bank’s UPI application. After successful login, she has to tap on the “Send Money / Payment” option.
| Bank A/c No. | Afterward, Miss Madhu has to select the bank account number to be debited. |
| Virtual ID | After selecting the bank account no. to be debited, she has to enter Miss Varsha’s (beneficiary/Payee) Virtual ID (VPA) and ₹ 10,000 (amount) to be sent, and shall have to write remarks for the transaction. |
| Review | Then, a confirmation screen will appear displaying Miss Madhu’s payment details. Review and confirm it. |
| Security | In order to initiate safe transactions, the UPI app will ask for a mobile pin to authenticate the payment. Miss Madhu will have to enter MPIN to authorize the transaction. Finally, after successful authorization, the ₹ 10,000 will be transferred to Miss Varsha’s bank account immediately. |
| Beneficiary | Miss Madhu need not register Miss Varsha before transferring funds through UPI as the fund would be transferred on the basis of Virtual ID/ Account+IFSC / Mobile No+MMID / Aadhar Number. |
With this, Miss Madhu has easily transferred 10,000 to her friend Miss Varsha through UPI app.
Note: In case of Virtual ID transaction, the beneficiary needs to have a Virtual ID and in turn be registered with UPI for receiving funds but in case of Account+IFSC or Mobile+MMID, Aadhar number, the beneficiary need not be registered for UPI.
How to Receive Money Through UPI
Through UPI, you can easily receive money from your friends, relatives, etc. To understand this process, assume that “Miss Madhu” wants to receive 5000 from her friend Miss Varsha”. For this, Miss Madhu first Log-in to her bank’s UPI application. Then, after successful login-
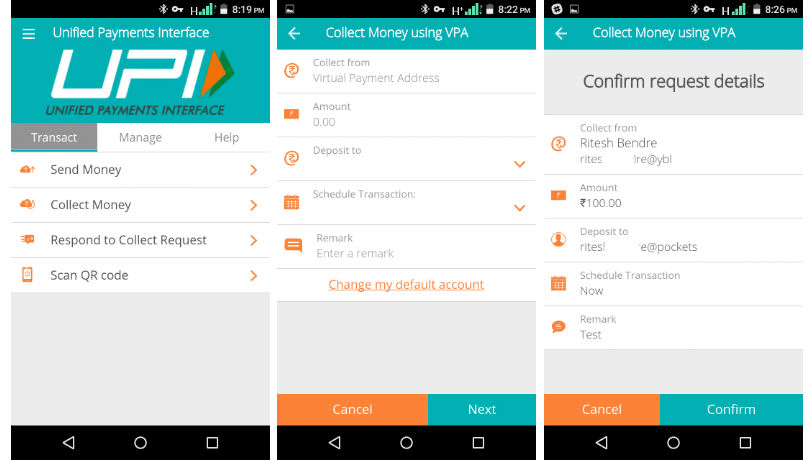
| Steps | Receive Money via UPI |
|---|---|
| Request | Miss Madhu has to select the option to collect money (request for payment). |
| Virtual ID | Then, she has to enter the Virtual ID of Miss Varsha, ₹ 5000 (amount), and the account to be credited. |
| Review | A confirmation screen will now appear displaying her payment details. Review and confirm it. |
| Request money | Miss Varsha (payer or sender) will get the notification on her mobile for a request of ₹ 5000 from Miss Madhu. |
| Review Payment Request | Miss Varsha will now tap on the notification and open her bank’s UPI app where she reviews payment requests. |
| MPIN | Then, Miss Varsha will have to tap on “accept or decline” the request for money from Miss Madhu. In the case of “accept” payment, Miss Varsha will enter MPIN to authorize the transaction. |
| Transaction | After a successful transaction, Miss Varsha will get a notification and SMS from the bank for credit to her bank account. With this, Miss Madhu will get ₹ 5000 from her friend Miss Varsha through UPI app. Don’t you think, is that simple! |
Excerpts of Limits and Rules of UPI
| S.No | UPI Rules |
|---|---|
| 1 | There is a transaction ceiling of up to ₹ 1 lakh per day and it works only inside Indian territory. Thus, you can’t transfer money abroad using UPI |
| 2 | Governed by the UPI Procedural Guidelines based on the Reserve Bank of India (RBI)’s Payment and Settlement Systems Act, 2007. |
| 3 | Every UPI app must have its own grievance redressal mechanism. |
| 4 | The system supports only debit-based accounts, which means credit cards cannot operate on the UPI and customers can only spend what they have in their bank accounts. |
| 5 | You will not be able to link NRE/NRO Accounts under UPI. |
| 6 | Once the payment is initiated through UPI app, it cannot be stopped. |
Customer Complaints
| S.No | Complaints |
|---|---|
| 1 | In case of any customer complaints regarding non-refund for failed transactions and/or non-credit for successful transactions shall be dealt with by the Payment Service Providers (PSPs)/Bank. |
| 2 | Any complaint about credit not being given to a beneficiary should be dealt with conclusively and bilaterally by the remitting and beneficiary banks as per the guidelines circulated by NPCI from time to time. |
| 3 | In case of any complaints related to UPI transactions, the first point of contact for the customer will be the customer’s PSP. Customer’s Payment Service Provider (PSP) has to mandatory provide an option in their App to raise dispute/complaint by providing transaction reference/Id number. |
| 4 | Though, if the customer decides to approach his/her remitter/beneficiary bank instead, the respective banks shall entertain all such requests and help to resolve the complaint to the customer’s satisfaction. |
| 5 | The PSP must provide to customers, the option of checking the current status of a transaction in the PSP App. |
To get all the latest tech news, like us on facebook and follow us on twitter, instagram & LinkedIn. |

