The UPI-based digital payment app “Bharat Interface for Money (BHIM)” has been launched by our honorable Prime Minister Narendra Modi at the Digi-Dhan Mela in Delhi’s Talkatora stadium to encourage digital transactions and increase participation of people in Lucky Grahak Yojana (for retail consumers) and in Digi Dhan Vyapar Yojana (for small businesses). The BHIM app is one app for all banks.
Let Us Know About BHIM In-depth
BHIM App: Key Features
| S.No | Features |
|---|---|
| 1 | Supports 7 new regional languages apart from existing English and Hindi languages. These are Odia, Bengali, Tamil, Telugu, Malayalam, Kannada, and Gujarati. |
| 2 | ‘Pay to Aadhaar Number’ has been introduced as a payment option, wherein customer can transfer money to the Aadhaar number linked with beneficiaries’ bank account. |
| 3 | The app has a ‘SPAM Report’ feature for collecting. This feature will help a user to block unknown persons requesting money. |
| 4 | Improvised Customer Redressal Mechanism with the drop-down menu is also added in the app. |
To know more about Unified Payment Interface (UPI), please click “Unified Payment Interface (UPI): Go Cashless With Digital Money Transfer“. |
BHIM Platform
The BHIM app is developed by the National Payment Corporation of India (NPCI) to enable fast, secure, and reliable cashless payments through the Unified Payments Interface (UPI) platform. You can send, receive, or request money from a payment address across any UPI supported banks.
Quick Snapshot of BHIM App
| Features | Description |
|---|---|
| Charges | No charges for making transactions through Bharat Interface for Money (BHIM) app |
| Transaction Limit | Maximum of ₹ 10,000 per transaction and ₹ 20,000 within 24 hours. |
| Languages | Support Hindi and English, and many other regional languages. |
| 24/7 | All payments are instant & 24/7. |
| Super Fast | Within a few seconds, the transaction process of money can be completed. |
| Query | The app has an in-built feature to raise a query with your bank inside a transaction. |
| Network | All payments are done using a secured network of UPI. |
| Money | Scan the QR code to pay or receive money. |
| Payment Address (PA) | Your mobile number is your payment address (PA) and you can simply start transacting. |
Note – Your bank might however levy a nominal charge as UPI or IMPS transfer fee. Please check with your bank for more details.
What Do You Require to Start BHIM App
- Smartphone.
- Internet access.
- An Indian bank account that supports UPI payments.
- The mobile number linked to the bank account.
- Link your bank account to UPI through the app.
How To Use BHIM App
First, you have to download the app from the Google Play Store or Apple App store. Once installed, Choose your language– English or Hindi (Available for both iOS & Android) or other given regional languages such as Odia, Bengali, Tamil, Telugu, Malayalam, Kannada, and Gujarati. Then, allow the app to verify you. This is for your security.
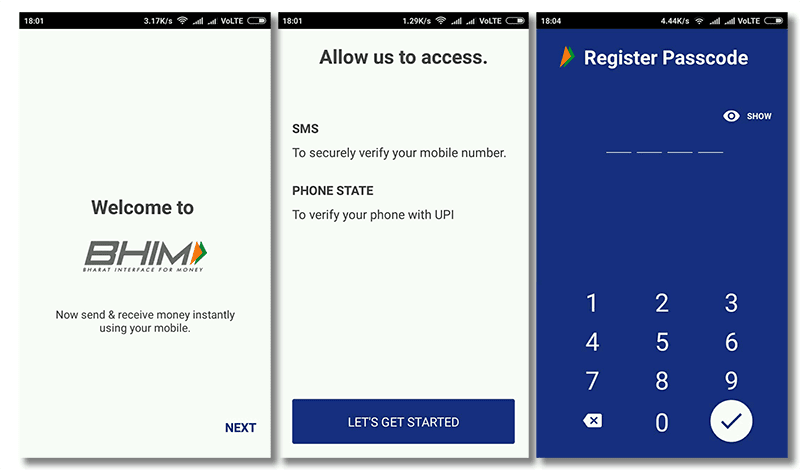
- Verify Mobile Number
The app will ask you to select your SIM card, in the case of a dual-SIM smartphone.
You will have to choose the SIM /Mobile number registered/linked with Bank accounts. - SMS
The app will send you the SMS verification code. With this, your mobile will be verified.
Now, you need to register your passcode. - Passcode
You’ve to choose your 4-digit Passcode.
Register & confirm Passcode. - Choose Bank
Choose Bank to link that you currently operating. The app will automatically fetch your bank a/c details.
This means that after choosing a bank, the app will automatically pick up your saving a/c number because your mobile number is already linked with your bank’s saving a/c no. - Options
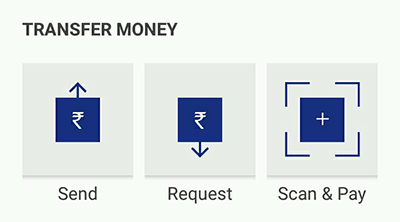
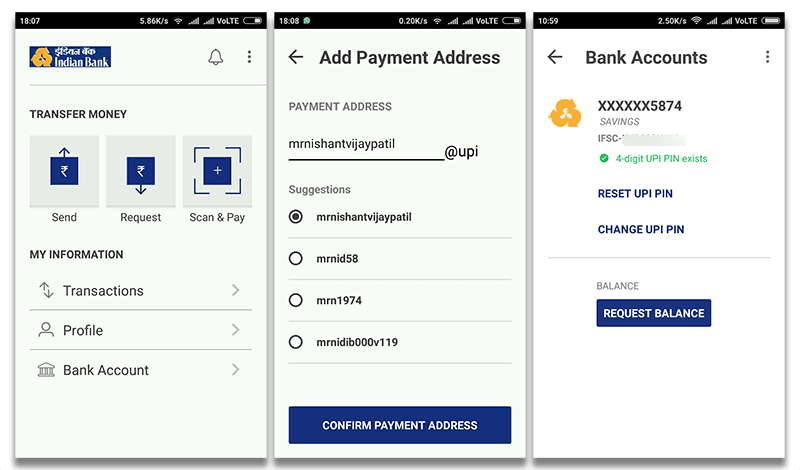
After this, the app will show a screen with options – Send, Request, and Scan and Pay. This means you have successfully set up the app and it is now ready to use.
UPI PIN
You have to set your UPI PIN by providing the last 6 digits of the debit card and the expiry date of the debit card.
Now, you can send, receive, collect money by using
- Virtual Payment Address (VPA),
- Account number + IFSC,
- Scan and Pay option.
You can also view your profile, records of transactions and by clicking on the Bank Account option, you can reset or change your UPI pin. By clicking on three dots in the right top corner, you can change your bank account if you wish to switch to another account from the current one.
How To Set Your UPI PIN Code
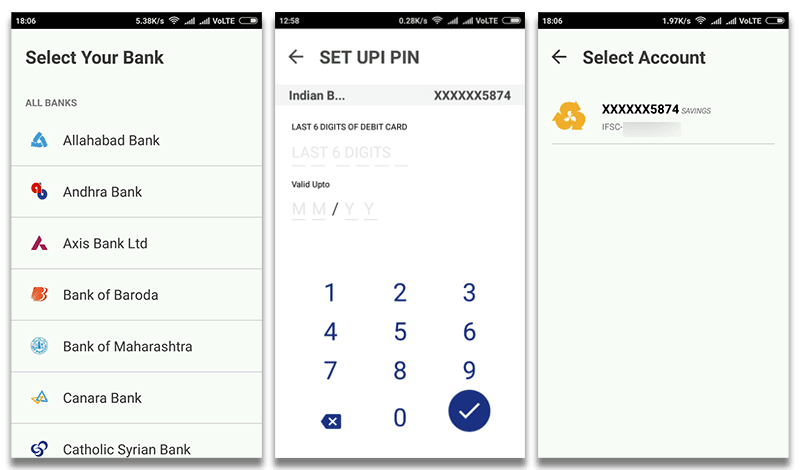
You’ve to set your 6-digit UPI pin code for transfer or receive money.
- To set UPI-Pin you have to enter the last 6 digits of your debit or ATM card details.
- Then, enter the validity of your ATM card – Month / Year and confirm it.
- Your UPI PIN will set.
How To Set Virtual Payment Address (VPA)
After successfully setting up the BHIM app and its UPI Pin, you have to set a Virtual Payment Address (VPA) for the transaction of money. To set VPA-
- Visit the Profile option and set VPAs.
- Two VPAs are allowed per user – mobileno@upi & name@upi.
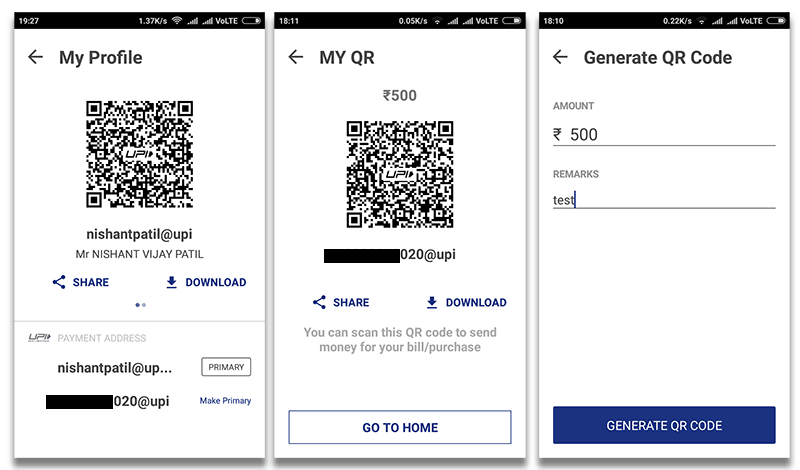
- Set one VPA as a primary virtual payment address (VPA) ( Ex. nishantpatil@upi or 91000000@upi can be primary VPA that makes it easy to share with others).
Besides VPA, the QR code feature is also available. In it, by using Scan and Pay option send and collect money anytime.
How to Send Money Through App
- Click the Send option.
- Enter or select the receiver’s mobile number or Payment Address (you can select from your contact list or enter it) or Aadhaar number.
- Enter the amount you want to send.
- Your default bank a/c gets selected.
- Enter UPI PIN and send.
- Alternately, you can also scan a QR code and pay via the ‘Scan & Pay’ option.
Note: Payment can be made via (IFSC, Account number) or (MMID, Mobile number) if the person is not registered on Bharat Interface for Money.
Ways to Transfer Money Through BHIM App
- Through QR Code: You can scan a QR code to pay or receive money. Merchants can easily print their QR Codes for display.
- Through the UPI address: The UPI address could be your name, mobile number, or even a nickname. Let me clear you, the UPI address has two parts like an email-ID. For example-technosavie@upi or 91000000@upi. The suffix would be a fixed word i. e. @upi, while you can choose the Prefix. The prefix can be your name, phone number, or anything you want.
- Through Mobile Number: A mobile-number based UPI address is generated automatically, but users have the option of creating and saving additional UPI addresses.
- MMID and IFSC: The money can also be sent to non-UPI supported banks. This can be done using MMID and IFSC.
How to Request Money Through App
- Select the Request option.
- Enter or select the receiver’s mobile number or Payment Address (you can select from your contact list or enter it) or Aadhaar number.
- Enter the amount you want to request.
- Click Send.
- This transaction will remain pending until the payment is received. You will be notified when the money is transferred to you.
- You may also request money by sharing your QR code. Go to Home Screen->Profile->Choose an account to get QR code.
Types of Transactions
Through Bharat Interface for Money (BHIM) you can make the following types of transactions:-
- Request or Send Money via Payment Address.
- Send Money to Aadhaar Number.
- Request or Send Money to Mobile number.
- Send Money through MMID, Mobile No.
- Send Money through IFSC code, Account No.
- In addition, you can use the scan and pay option for Merchant payments.
To get all the latest tech news, like us on facebook and follow us on twitter, instagram & LinkedIn. |